
Beginner's Sourdough Recipe and Guide
Introduction | Preparing Your Starter| Recipe (with links to helpful videos)
Dough Development Guide | Printable Recipe Card
January 2021: This recipe has been updated with a detailed sample baking schedule and instructions on how to prepare your starter for baking, found here. Times on the “Dough Development Guide” have been updated to avoid confusion, but the timing within the recipe is the same as originally published.
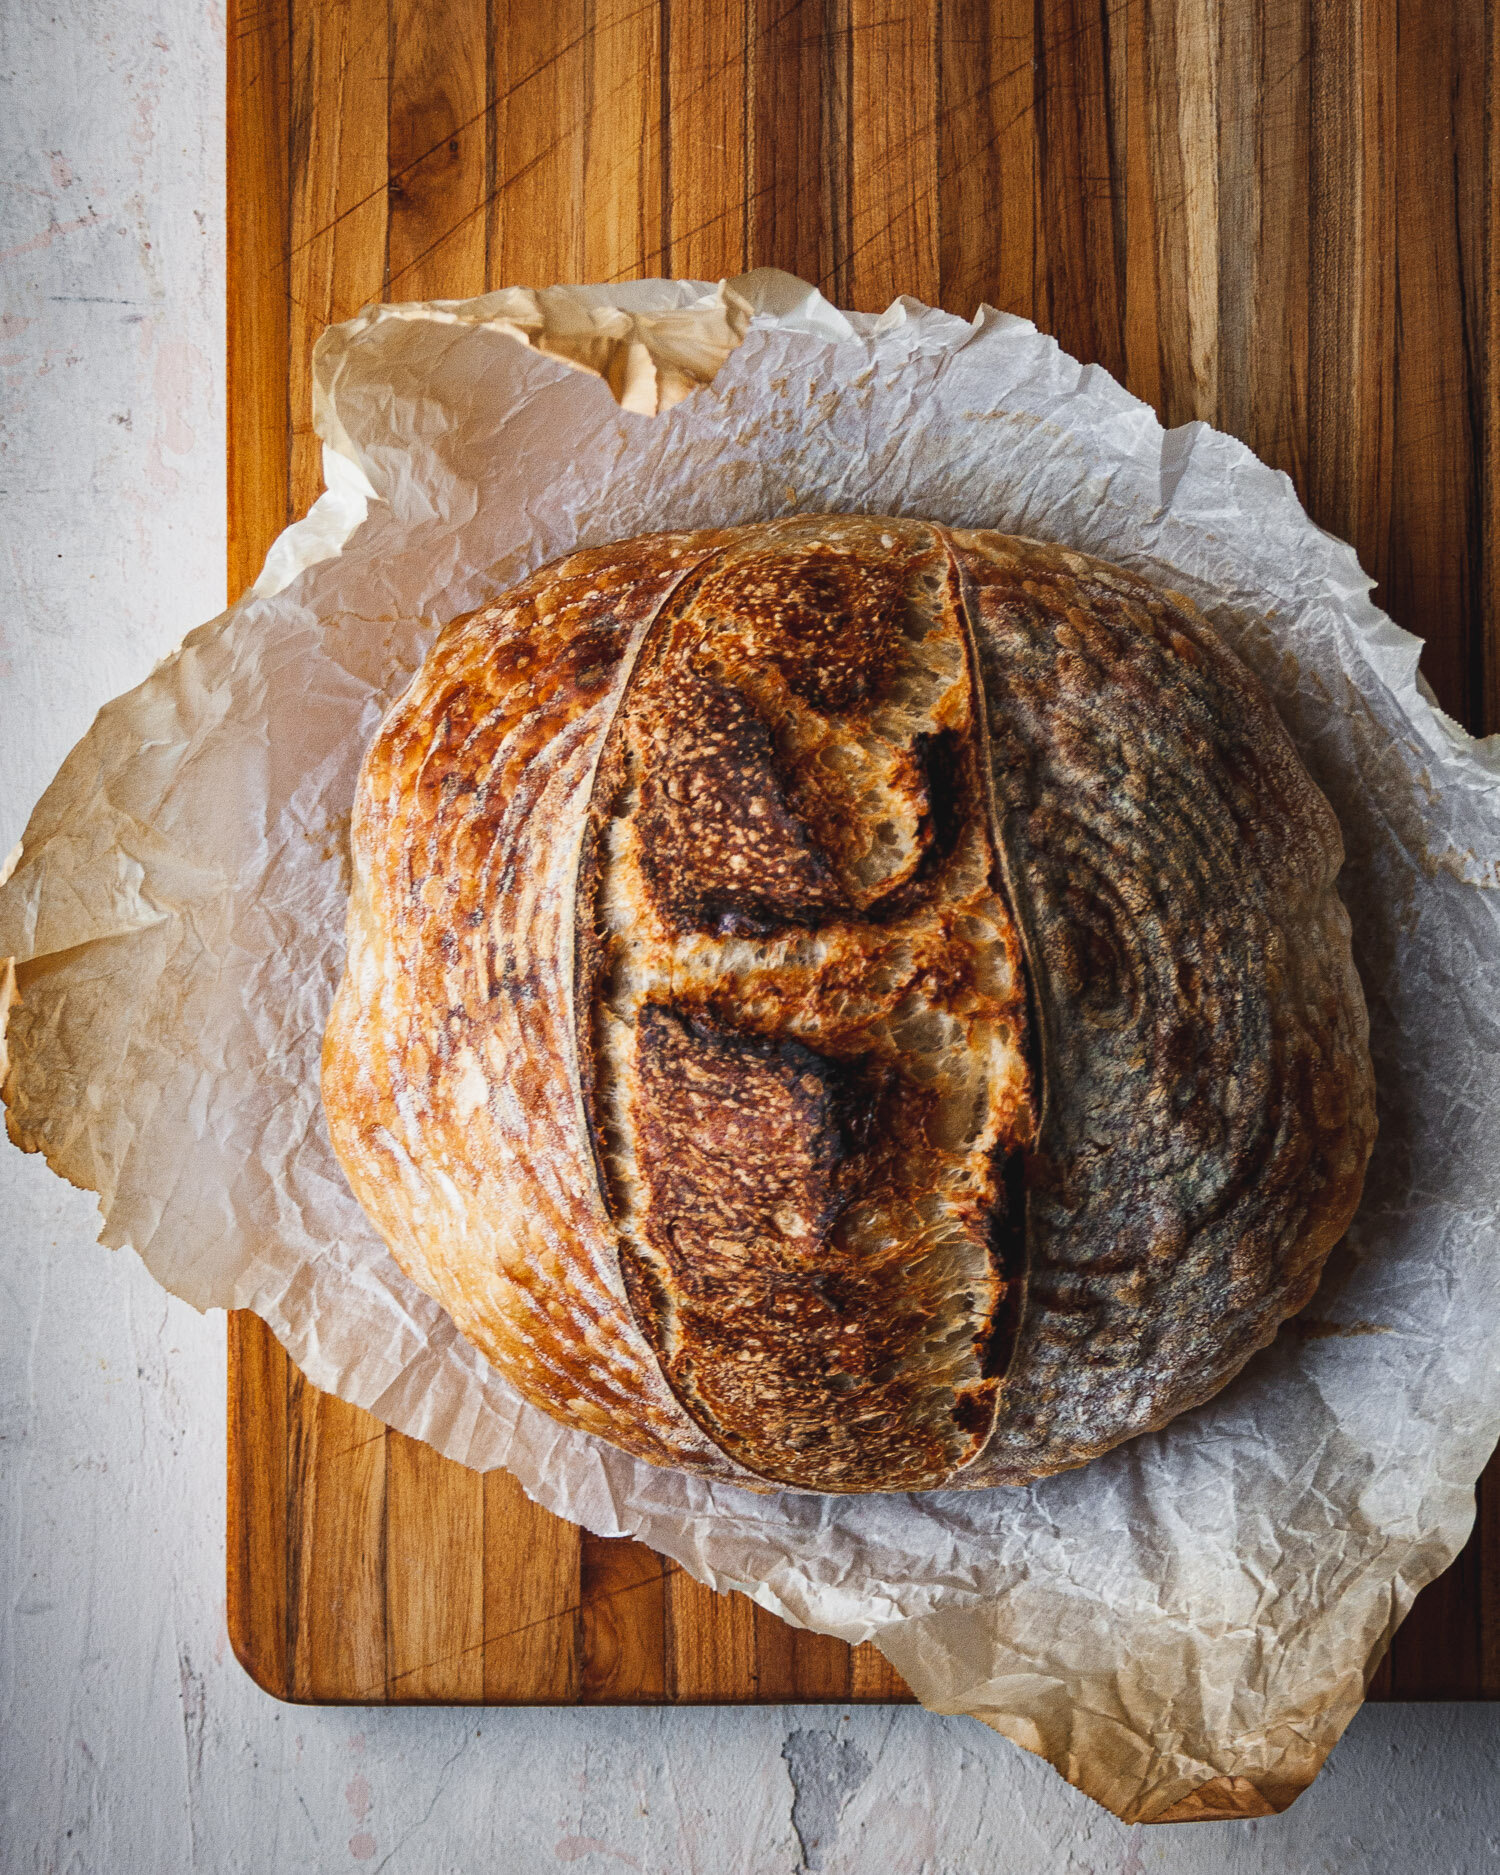
Make your own naturally leavened bread from scratch.
Learn how to make sourdough bread at home with this easy recipe and guide. You will need a healthy sourdough starter to make this recipe, so start here if you don’t have one yet.
This recipe works for beginners because:
The dough won’t be too wet to handle; at 70% hydration, this recipe makes a crusty, artisan sourdough loaf with a soft interior.
No specific levain is needed—bake straight from your starter. Just make sure you have 100 grams available for the recipe with some left to feed and maintain for later. A sample starter feeding routine has been added to the guide here.
Only one type of flour is needed—bread or all purpose. Methods for both are described.
There are helpful links to videos and terms from my Sourdough Glossary within the recipe instructions that will familiarize you with the entire sourdough process.
I have the same recipe in a condensed printable recipe card format at the bottom of this page. Choose your own baking adventure!
Introduction: Helpful Tips for Beginners
Sourdough takes time.
If you are just beginning to learn how to make homemade sourdough bread, you’ll notice that sourdough recipes take substantially longer from start to finish than yeasted bread recipes. Sourdough starter needs more time to raise and ferment a loaf of bread than instant or active dry yeast, but the payoff is big. Breads with longer fermentation times have more opportunity to develop flavor and structure, as well as convert starches into other beneficial nutrients. In essence, don’t rush the process and you will be rewarded.
Your sourdough starter must be ripe at the beginning of this recipe. You can find a starter feeding schedule below that details the times and amounts to feed your starter for maximum growth potential. Remember, happy starter=happy bread!
Once your starter is ripe, this recipe takes approximately 24 hours from start to finish—including cooling—but the majority of that time is hands-off, letting the dough rest. The most hands-on work takes place during the first day, so plan to be around at the beginning, and then give your dough an overnight rest in the refrigerator.
Since this recipe uses the refrigerator to slow down the fermentation activity during the final proof, you can buy some time during this step if needed.
Follow the sensory cues.
If you read my article Everything You Need to Know About Sourdough Starter, then you know that I am very emphatic about using sensory cues—touch, sight, smell, and sound in this case, since we don’t usually taste raw dough. I’ve included several helpful cues within the recipe to help you accurately gauge where your dough is in its development.
I’ve given windows of time for each step, but depending on the conditions in your kitchen (temperature, strength of your sourdough starter) you may find things moving along more quickly or more slowly than I describe. Pay attention to the way the dough is supposed to look and feel, and you will develop your own sense of timing with practice.
Make this recipe multiple times.
I’m truly hoping that your first loaf of sourdough bread using this recipe is a wild success! But the reality of sourdough baking is that there is a learning curve, and sometimes things don’t work out. I don’t want you to be scared away if your first or second loaves are flat, dense, misshapen, or otherwise less-than-ideal.
Technique, timing, and the innate understanding of how to handle bread dough are learned by making bread over and over. I’ve had amazing successes and absolutely spectacular failures, and to this day, I learn from my mistakes. Bread is a humble food with simple ingredients; the technique is where you turn flour and water into that beautiful crusty loaf you can’t wait to tear into.
If your loaves don’t quite turn out, you can turn them into these Herb Seasoned Sourdough Breadcrumbs or Parmesan Garlic Croutons. Happy accidents, right?
Tools
Below are the tools you will need (listed in the order you will need them) for homemade sourdough bread, along with the tools that are helpful to have. I’ve listed the tools I use and like first, with alternate suggestions where possible.
A clear-sided mixing bucket, or a large mixing bowl
A scale that measures in grams
A dough whisk, or a spatula to mix with
A bench scraper (I prefer metal)
A banneton (helpful) or a colander and rubber band
Rice flour for dusting your banneton or tea towel (helpful, but you can substitute all purpose or bread flour)
A plate
A lame, a new single edged razor blade, or the sharpest knife you have
A dutch oven or pizza stone or baking tray
As an Amazon Associate, I earn on qualifying purchases. Your purchase through these links comes at no additional cost to you and helps me continue to deliver great recipes and maintain Bread & Basil.
The lame I link to is made by my friend Tyler of Wire Monkey Shop. I highly recommend this product and will receive a few dollars if you purchase the lame through my link.
Preparing your starter for this sourdough bread recipe

Many folks have asked for a sample baking schedule, including how to feed your starter to prepare it for baking. I am admittedly a late riser and night owl, but I’ve adjusted this to fit a more typical schedule. Keep in mind that this is an EXAMPLE of a schedule. Read your dough for the development clues listed above to properly time your baking.
Starter refreshment takes one day, dough development and proofing take one day, and then baking and cooling happen on the final (third) day. So, if you want to have a freshly baked loaf on Sunday, start the starter refresh process on Friday.
The day before beginning the recipe below:
9:00 am: Take 20 grams of cold starter from the fridge and add 20 grams of flour and 20 grams of water. Leave on the counter to rise.
5:00 pm: Save 20 grams of starter and discard the remaining 40 grams (save if desired for a discard recipe). To the saved 20 grams, add 20 grams flour and 20 grams water. Leave on the counter to rise.
11:00 pm: Save 50 grams of starter and discard the remaining 10. To the saved 50 grams, add 100 grams flour and 100 grams water. The reason for changing the ratio in this step is to allow the starter to rise overnight while you’re asleep. If you feed in a 1:1:1 ratio at this point, the starter will peak while you are asleep and be very hungry on Saturday morning, weakening it overall. Using a 1:2:2 ratio gives the starter a bigger meal, which will slow down the rise, suiting our sample schedule. Doing this does NOT change the hydration of your starter. Leave on the counter to rise.
The day you plan to start the recipe:
9:00 am: Take 100 grams of starter out and return the remaining starter to the refrigerator for storage. To the saved 100 grams, add 100 grams of flour and 100 grams of water. Leave on the counter to rise.
Allow this starter to mature, which should take between 4-6 hours, then proceed with the recipe below.
Beginner’s Sourdough Bread Recipe
Dough Formula
makes one loaf
| Ingredient | Weight | Baker's Percentage |
|---|---|---|
| Bread flour or all purpose flour (see note) | 500 grams | 100% |
| Water (room temperature, about 75°F) | 350 grams | 70% |
| Sourdough starter (ripe) | 100 grams | 20% |
| Salt | 10 grams | 2% |
Note: Bread (strong, high-gluten) flour will make the dough easier to handle because it contains more protein than all-purpose flour. This allows gluten to develop more easily, which helps give the dough its elasticity and structure.
If you are using all-purpose flour, hold back 15 grams of water (add a total of 335g water) to make the dough slightly easier to handle.
This recipe is designed to make one loaf. If you would like to make two, simply double the weight of each ingredient and proceed as normal. In Step 5, divide the dough into two pieces with your bench scraper before pre-shaping each.
Times below are an example.
Method
Step 1: Mixing [1:00 pm]
Place your mixing bucket or bowl on a scale and “tare” to 0 grams. Add sourdough starter and water. Stir thoroughly to break up the starter within the water. Add the flour and mix until no dry spots remain; this might take a little bit of effort. Cover the container and allow the dough to rest for 45 minutes.
In this initial stage, the dough should look shaggy and lumpy, and feel very sticky.
Read about this step, called autolyse or “fermentolyse” here.
Step 2: Adding the salt and beginning gluten development [1:45 pm]
After 45 minutes, the dough will appear much more elastic, but still be sticky to the touch.
Sprinkle the salt over the top of the dough, and then with wet hands, begin to fold the dough over itself to incorporate the salt. To do this, leave the dough in the bowl and pick up one “side” of the mass. Stretch it up as long as it will go without breaking, then fold it over the top of the dough. Repeat on the opposite side, this time folding the bottom up and over. Now repeat with the right and left sides of the dough. Continue to do this action, called the “stretch and fold” for 2-3 minutes to incorporate the salt and begin to develop strength in the dough. Cover the container and allow the dough to rest for another 30 minutes.
Watch: How to Stretch and Fold Sourdough
Step 3: Developing dough strength and bulk fermentation (the first rise) [2:15 -4:15 pm]
For the next 2 hours, you will repeat the stretch and fold action every 30 minutes for a total of 4 sets of stretch and folds. With each set, it should be a little bit more difficult to stretch the dough up and over as far. The dough will tighten up into a ball after each fold, and then relax back to the shape of the container during the 30 minute rest.
The dough will begin to feel lighter, with more and more air pockets developing throughout. You will degass—press out some air—the dough a bit while handling it but take care not to squeeze it too much.
To test if the dough has developed sufficient strength, perform the windowpane test. To do this, stretch a small section of dough up away from the surface and spread it between two fingers. If you can see light pass through the dough without it breaking or tearing, your dough has developed enough gluten. 4 sets of folds should do it, but if you need to add in a 5th set, feel free to do so following the same 30-minute rest pattern.
Watch: How to do the Windowpane Test for Bread Dough
Step 4: Continue bulk fermentation [4:15 - 7:15 pm in my 73°F kitchen]
Once the dough passes the windowpane test, cover the mixing container and allow the dough to rise without disturbing it until light, with bubbles visible on the surface. If you have a clear mixing container, you will also see bubbles all throughout the bottom and sides of the dough. The dough will gain volume and become and 1.5 to 2 times bigger in size. This step can vary in time and may finish between 4-7 hours from when you first mix the dough in Step 1.
Read more about Bulk Fermentation here
Step 5: Pre-shape the loaf [7:15 pm]
Very lightly dust a counter with rice or all purpose flour. Using a wet hand, coax the dough away from the sides of your mixing container until it easily pulls away and gently dump the dough onto your floured surface. Using the same motion as the stretch and folds you performed earlier, gather the mass of dough into a ball by stretching and folding the top, bottom, and left and right sides of the dough up and over into the center.
Flip the dough over seam side down and allow to rest on the counter, covered with a tea towel, for 30 minutes.
Watch: How to Pre-Shape a Sourdough Boule
This is a good time to prepare your banneton or home-fashioned proofing basket. If using a banneton, dust with rice or all purpose flour and set aside until ready to use. If making your own basket, take a lint-free tea towel (something without loops) and drape it in a colander. Place a rubber band around the edge to secure the towel, then dust heavily with rice or all purpose flour. It can help with both a banneton and a towel-lined colander to spritz the surface with water from a clean spray bottle before dusting with flour—this way, the flour doesn’t all collect at the bottom and sticks to the full surface.
Step 6: Shape the loaf [7:45 pm]
If your dough is very slack and has spread out almost flat again, flip the dough back so the seam side is up, and repeat the same action you did for the pre-shape. Flip the dough seam side down, and using your bench scraper, gently push the dough across the counter to form a tight-skinned ball.
Watch: How to Shape a Sourdough Boule
Step 7: Final proof [7:45 pm on counter, 8:45 pm - 9:00 am in refrigerator]
Immediately place the boule seam side up in your banneton or proofing basket and cover with plastic—a clean shower cap works wonderfully for this job and is reusable. Allow to sit at room temperature for an hour, then place in the refrigerator overnight or for 12-16 hours.
Read more about the Final Proof here
Step 8: Preheat the oven and finish proofing [9:00 am]
The next morning, preheat your oven—with a lidded Dutch oven, a baking stone, or a baking sheet—to 500°F for at least one hour before putting the loaf in.
Meanwhile, remove the loaf from the refrigerator and perform the poke test: lightly flour a spot on the top of the dough and press your index finger straight down into the dough. The hole should fill in slowly when the loaf is fully proofed. If the dough springs back and fills in right away, leave the dough out at room temperature while the oven preheats to allow it to warm up slightly and finish proofing. If the hole fills in slowly, return the loaf to the refrigerator and remove it for baking once the oven is sufficiently preheated.
Watch: How to do the Poke Test for Sourdough
Step 9: Score and bake [10:00 am]
Cut a piece of parchment paper slightly wider than your loaf and crumple it, then smooth it flat. Doing this helps the loaf maintain its round shape. Place the parchment on a plate or cutting board, then place it parchment-down on top of the banneton or proofing basket. Flip the dough onto the parchment-covered plate or board, then remove the basket.
Working quickly and confidently, score the bread with your lame, razor, or knife. You can try a classic X pattern, one straight cut from top to bottom, or three parallel lines. Cutting at a 45° angle to the surface of the bread helps with the development of an “ear”, or that signature raised edge you see on artisanal loaves.
Watch: How to Score Sourdough Bread
If using a dutch oven: remove from the preheated oven and remove lid. Quickly and carefully, use the parchment as a sling to lift and place the loaf of bread into the dutch oven. Cover, and place in the oven. Bake for 20 minutes covered at 500°F, then carefully remove the lid, lower the oven temperature to 475°F, and bake for an additional 15-20 minutes.
If using a baking stone: either slide the parchment paper with the loaf from the plate or board onto the preheated stone or lift it and place on the stone. Bake for 20 minutes at 500°F, then lower the oven temperature to 475°F, and bake for an additional 15-20 minutes.
If using a baking tray: use the parchment as a sling to lift and place the loaf on the preheated tray. Bake for 20 minutes at 500°F, then lower the oven temperature to 475°F, and bake for an additional 15-20 minutes.
Read about how to create steam when using the baking stone or baking tray methods here.
Step 10: Cool completely and cut [10:40 am - 1:00 pm]
Remove the bread from the oven and, wearing oven mitts, lightly tap the bottom of the loaf. If it sounds hollow, it is done. To be sure, insert an instant-read thermometer into the bottom of the loaf. A finished loaf will read about 205°F at the center.
Cool completely before cutting. Store uneaten bread in a paper bag or loosely wrapped in a tea towel. If bread goes a bit stale, toasting it is a great way to instantly improve the texture after a few days.
Why do I have to wait so long to cut it? Read more here
Like this recipe? Leave a comment below, share, and tag me on Instagram @breadandbasil and using #breadandbasil
Dough Development Guide
Bulk fermentation is a crucial stage in sourdough baking that many beginning bakers have trouble gauging. These photos depict different stages of the dough development process, from mixing to the end of bulk fermentation.
Notice the textural and volume changes, along with the timing I followed. The day that I took these photos, it was about 73°F in my house. If it had been 75°F or above, this initial rising process may have taken up to two hours less, so pay attention to how your dough is behaving more than the times.
This section was updated in January 2021 to reflect a sample baking schedule added to the recipe above.
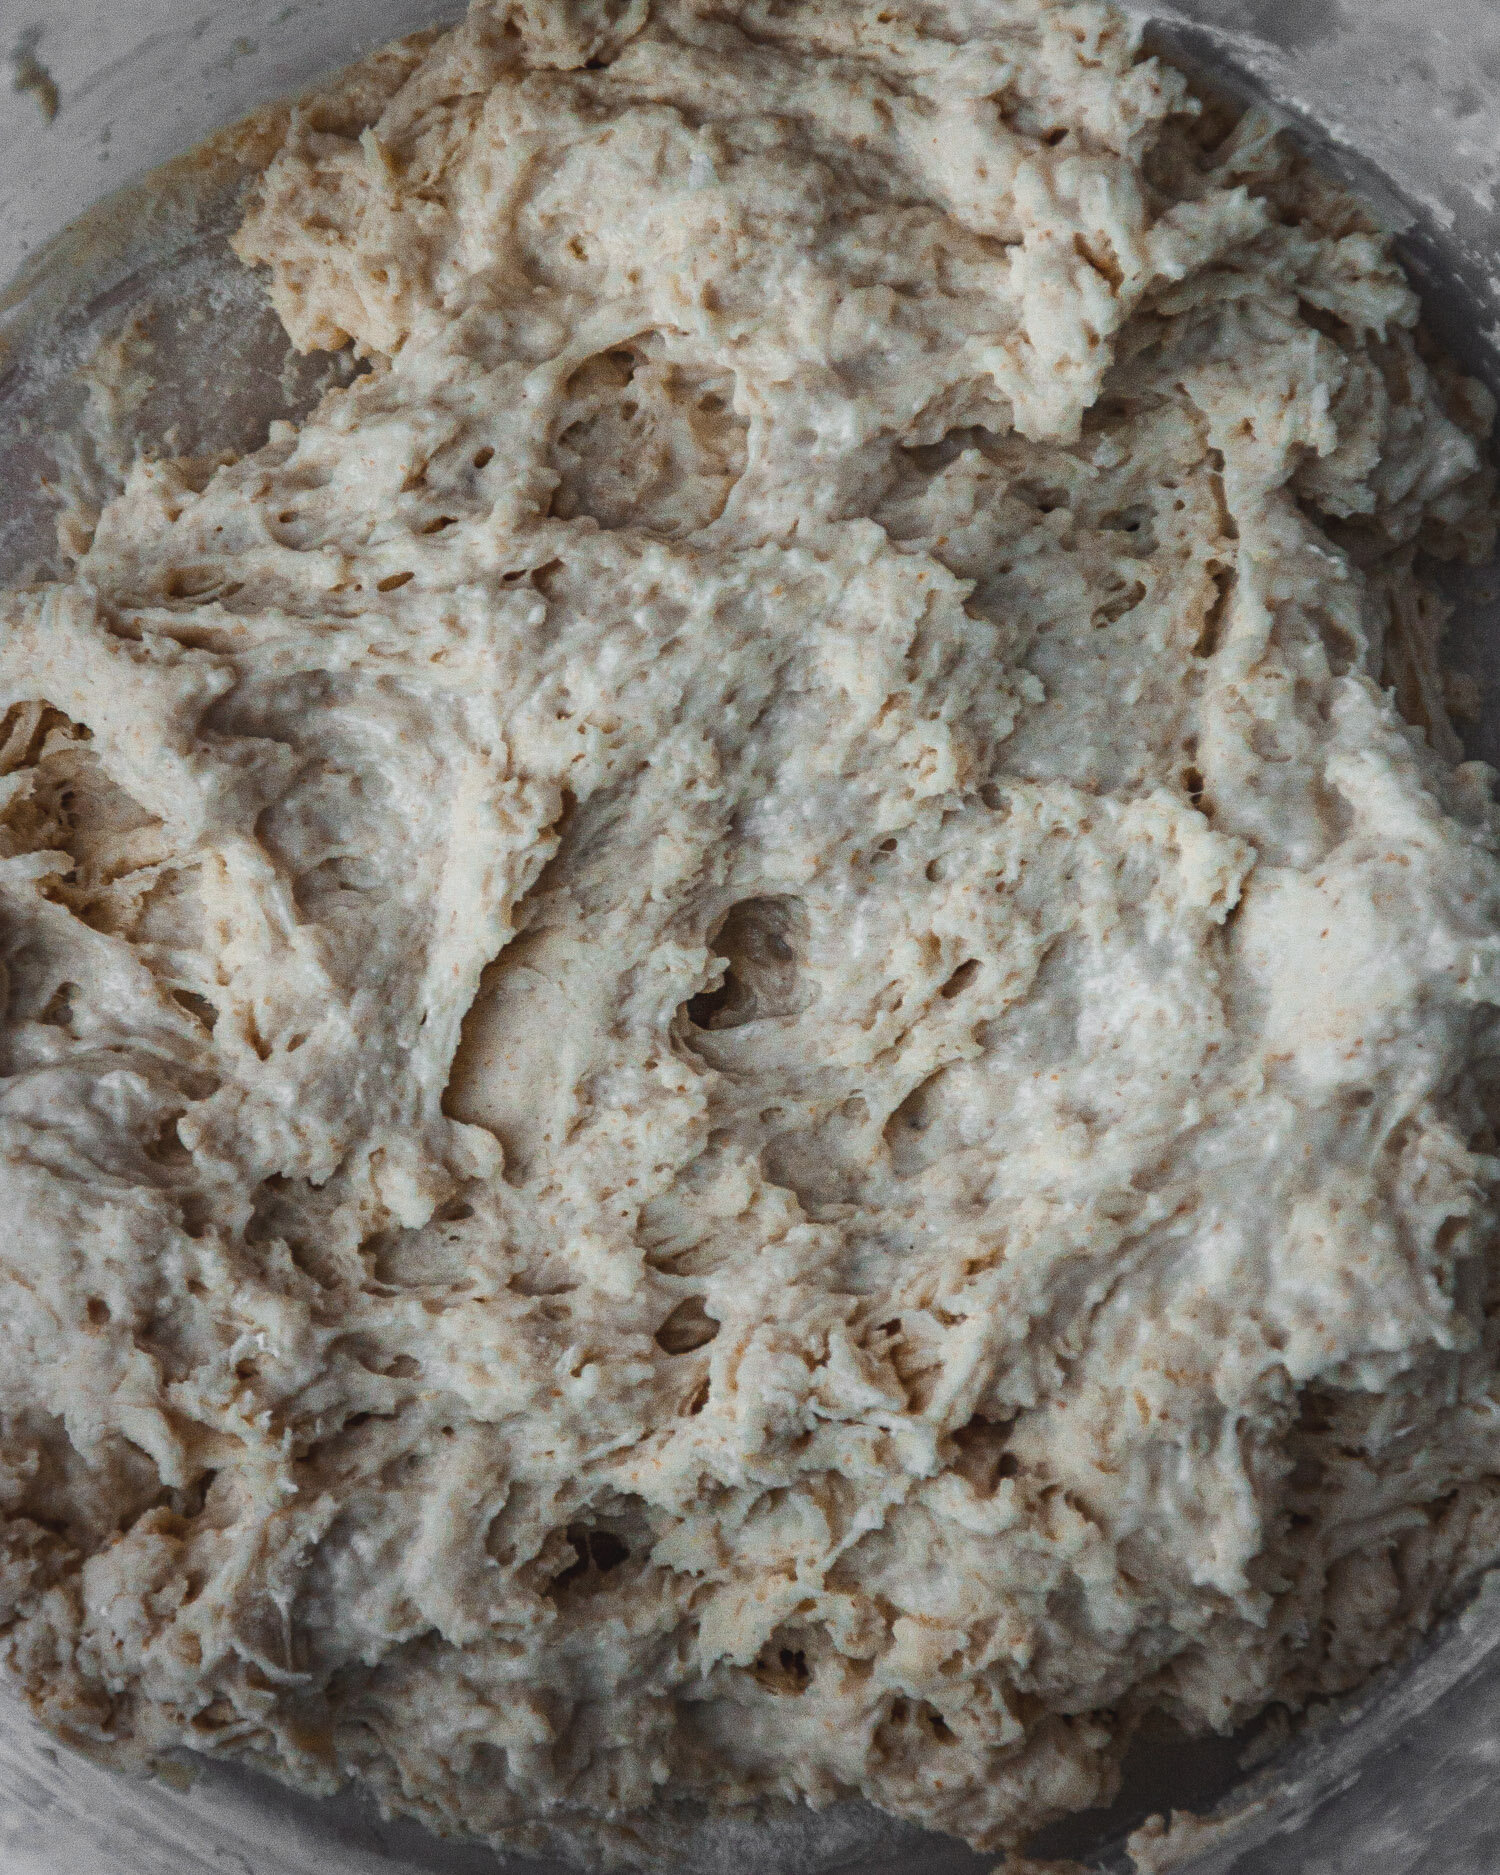
1:00 PM
Sourdough starter, flour and water just mixed. It’s super shaggy and sticky. This will “fermentolyse” for 45 minutes.

1:45 PM
Salt has been added and the dough has been stretched folded for 2-3 minutes. It’s still very shaggy

2:15 PM
After a 30 minute rest and one stretch and fold.

2:45 PM
Just before the second stretch and fold. The dough has relaxed and slackened, and you can see exactly how I folded it before.

2:45 PM
Just after the second fold. Note how the dough is becoming smoother and holding more shape. It will get another fold at 10:45 (not pictured).

3:45 PM
After doing the first mix, the salt fold-in, and 4 subsequent sets of stretch and folds (2:15, 2:45, 3:15, 3:45), the dough is sufficiently strong, smooth, and elastic.

6:45 PM
The dough has rested three hours from the last stretch and fold, and has been rising at room temperature for nearly 6 hours since the first mix. I decided to let it go just a bit longer…

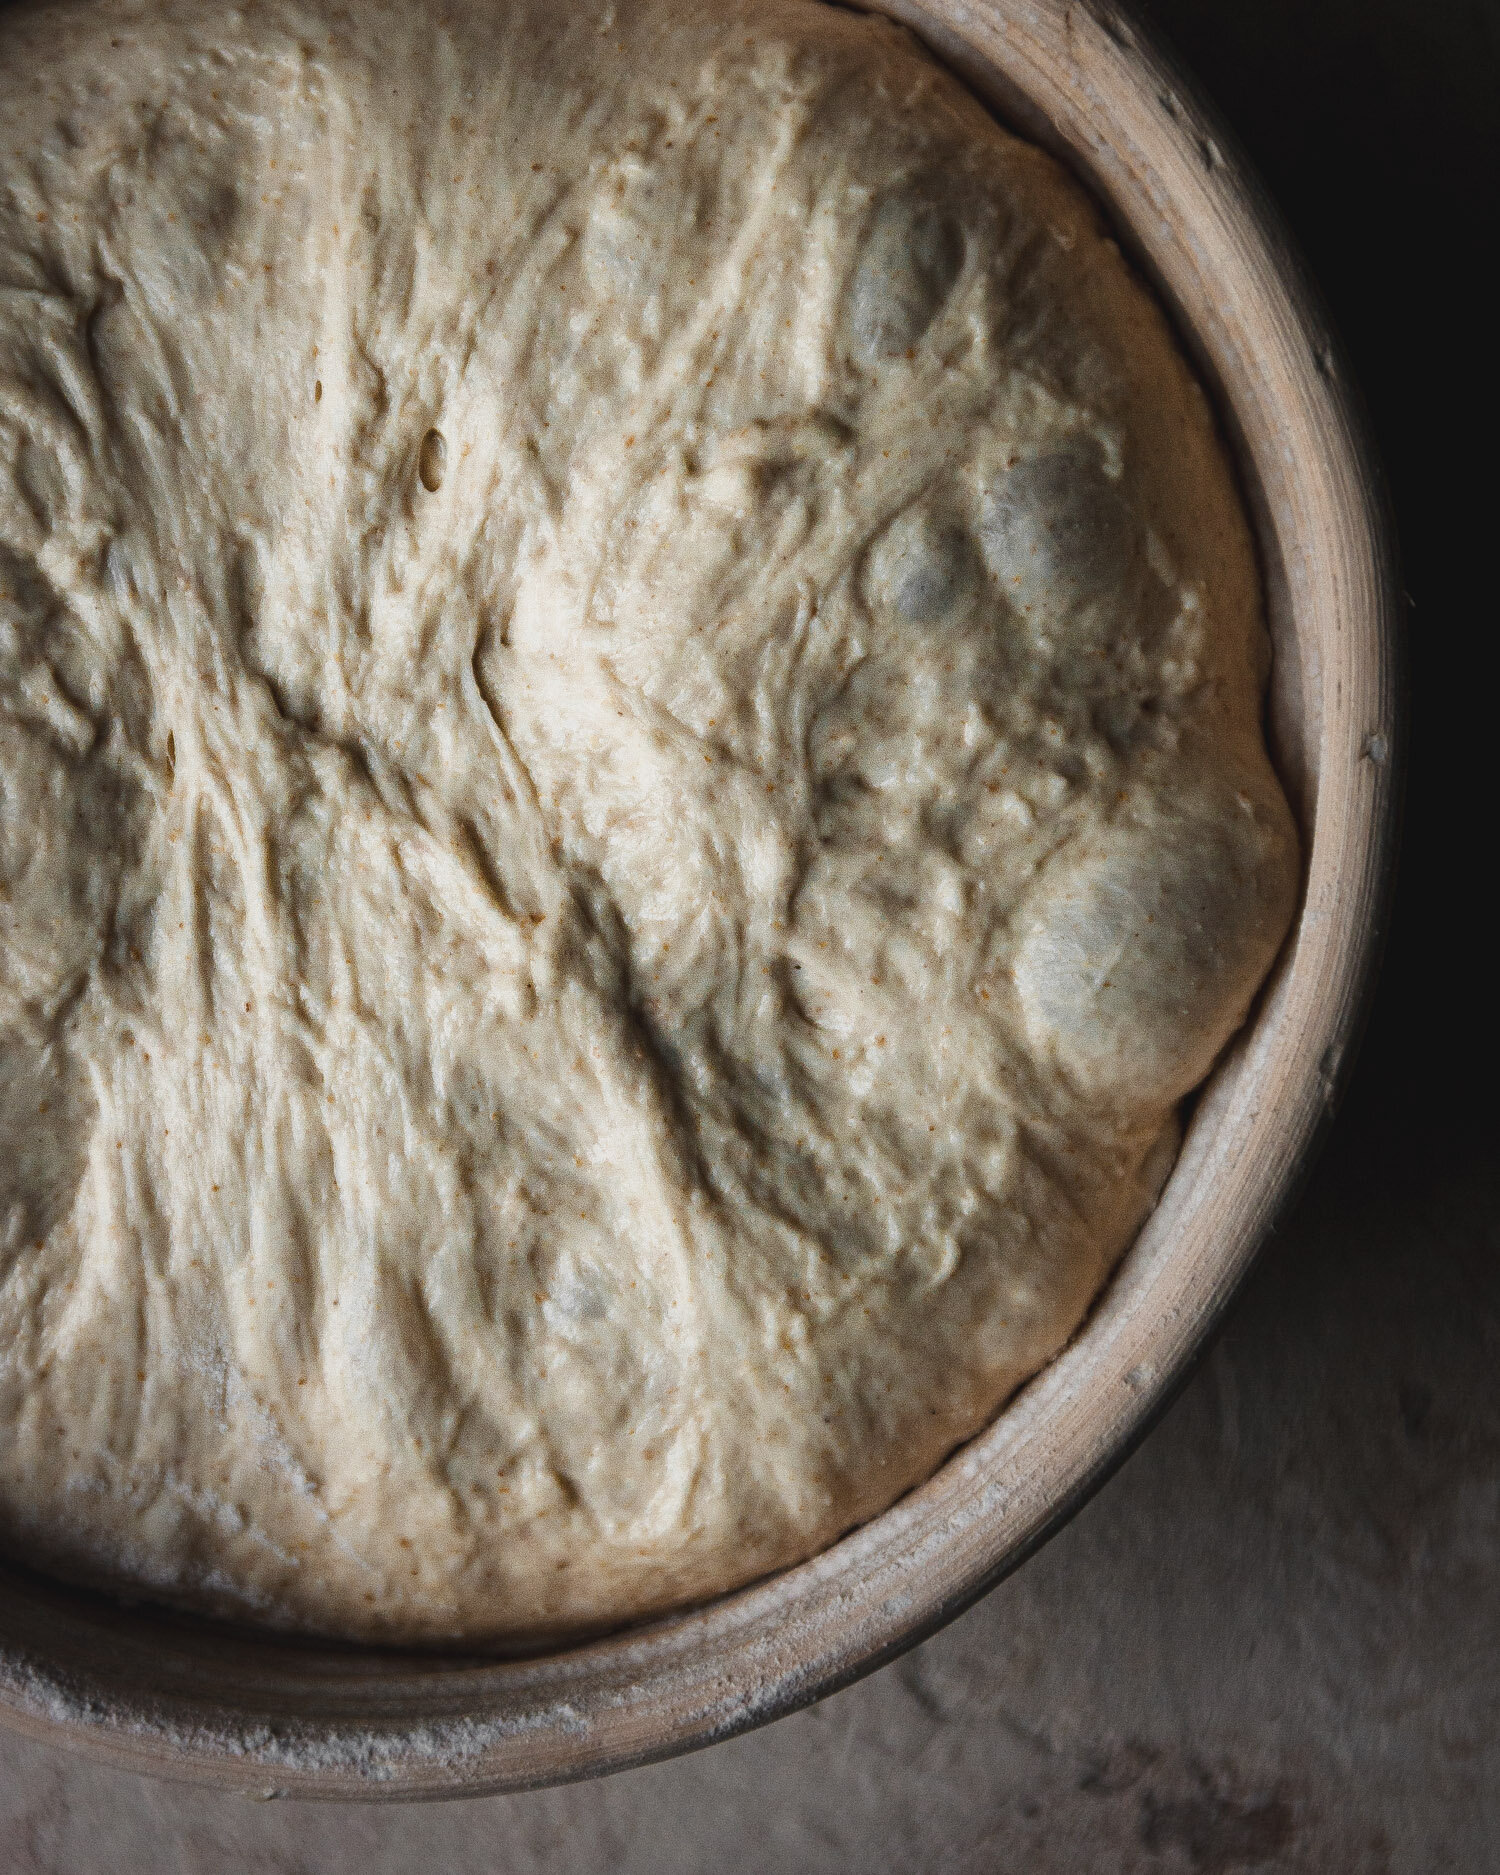
7:15 PM
30 minutes later, there are more visible bubbles on the surface of the dough and its gained an additional bit of height in the container. It’s aerated, light, and no longer sticky. Bulk fermentation: complete!
Final Thoughts
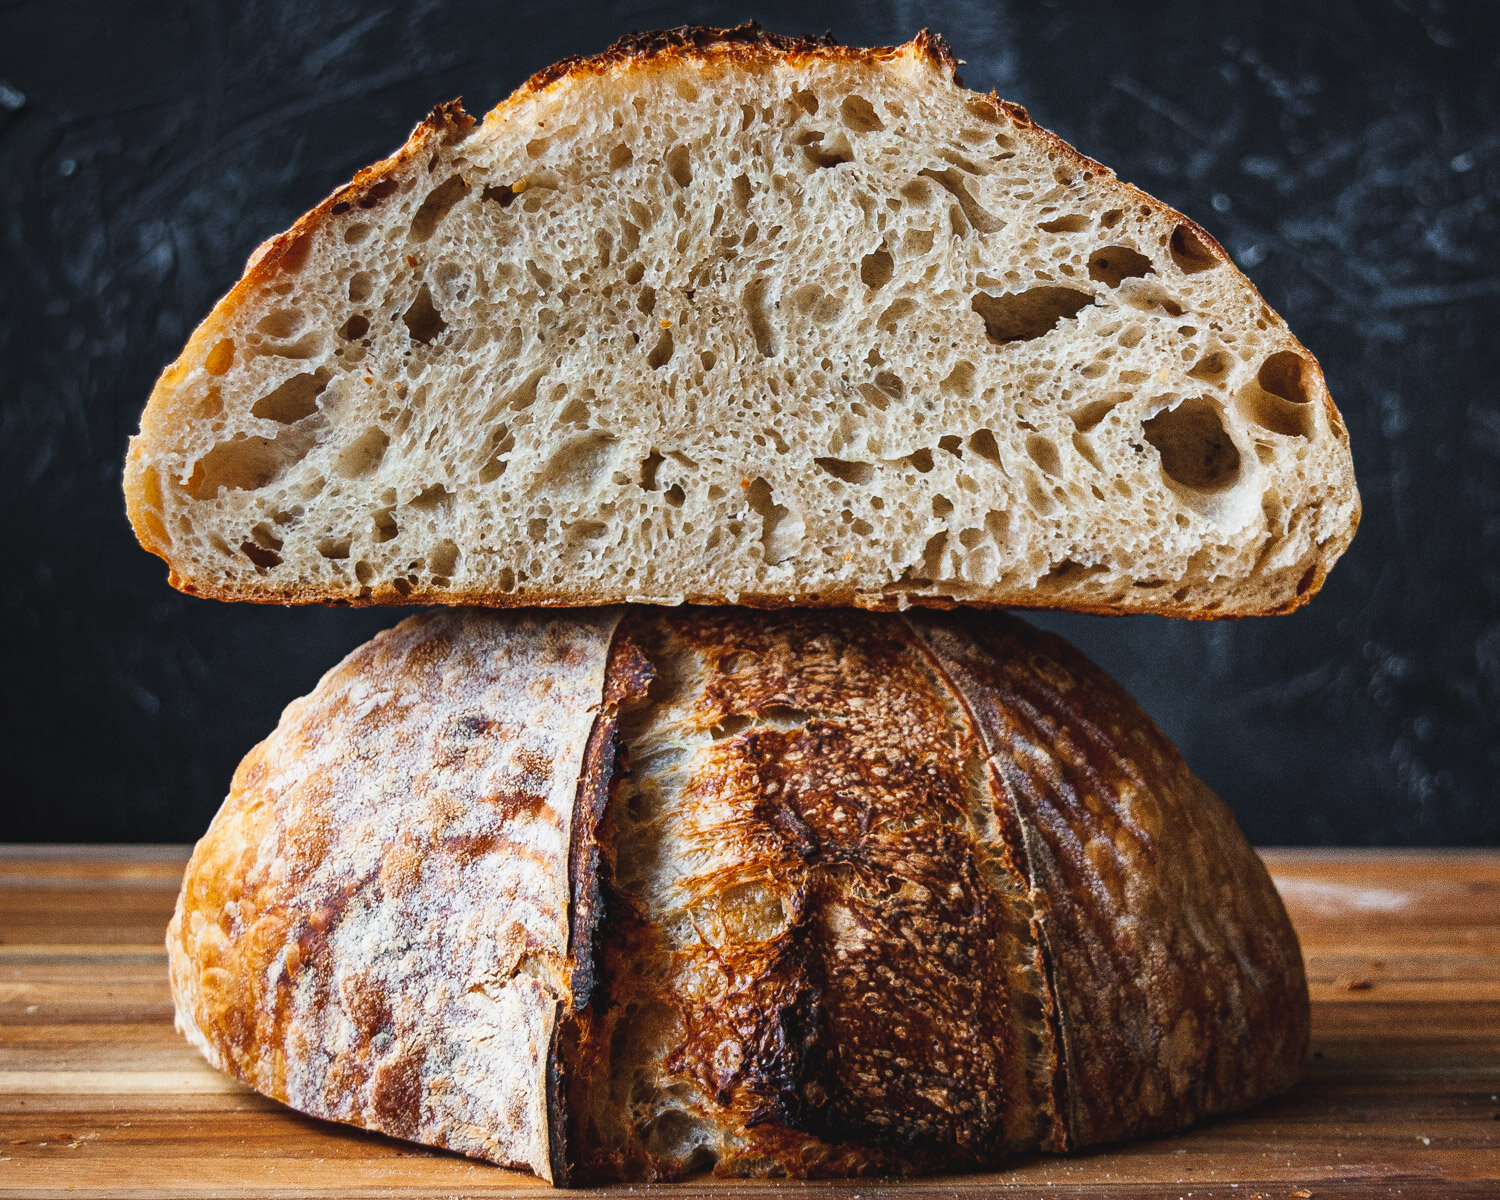
To me, this recipe represents all the basic elements of a good sourdough bread: crunchy and deeply flavorful crust, soft and fluffy interior with a substantial chew and nice crumb structure, and a rich, tangy sourdough flavor that comes from a long fermentation time. With no over-complicated techniques to get bogged down in, this loaf is perfect for beginners, but truly accessible for any sourdough baker who wants a dependable workhorse loaf.
Learning to make this bread helped me develop my dough handling skills, my eye for good fermentation, and my feel for the overall baking process. With practice, you will be making beautiful artisan breads in your kitchen in no time, and you’ll be hooked on the bread-making process just like me.
If you ever get lost in the details, refer back to the recipe, check the glossary for more detailed instructions on every step, and start communicating with other bakers!
Below is a printable recipe card of the same recipe and process above.

Beginner's Sourdough Bread
Ingredients
Instructions
Notes:
Bread (strong, high-gluten) flour will make the dough easier to handle because it contains more protein than all purpose flour. This allows the dough to develop gluten more easily, which helps give dough its elasticity and structure. If you are using all purpose flour, hold back 15 grams of water (add a total of 335g water) to make the dough slightly easier to handle.
This recipe is designed to make one loaf. If you would like to make two, simply double the weight of each ingredient and proceed as normal. In Step 5, divide the dough into two pieces with your bench scraper before pre-shaping each.


