
Sourdough Baking Glossary
Learn the must-know sourdough baking vocabulary.
Bread bakers use a lot of terms to describe their recipes and processes that may be unfamiliar to even an experienced home baker. This sourdough glossary will help you learn the lingo and techniques you need to know to become a confident sourdough baker, with helpful videos and tips along the way.
This guide contains affiliate links. As an Amazon Associate, I earn on qualifying purchases. Your purchase through these links comes at no additional cost to you and helps me continue to deliver great recipes and maintain Bread & Basil.
Like this guide? Follow Julia on Instagram and Pinterest for more Bread & Basil content.
Sourdough Bread Glossary
Click on any term below to jump to that section of the glossary.
Autolyse
Some bread recipes contain an initial step called autoylse. This means that you mix the flour and water in a recipe and allow it to rest before adding the sourdough starter and salt. This mix and resting period kickstarts the gluten development process. Gluten is the protein found in various kinds of wheat, which is what allows bread to have structure and gives elasticity to dough. In bread baking, gluten is a great thing! Autolyse can be short, around 30 minutes, or long, up to two hours, depending on the baker’s preference and schedule.
I happen to like a method called “fermentolyse” which involves mixing the flour, water, and starter, and allowing the process of bulk fermentation to start while also developing some gluten. Once you add salt after this 30-45 minute rest, the texture of the dough changes significantly by tightening, so it’s good to develop some gluten before doing this.
Baker’s Percentage
A baker's percentage is a dough formula expressed where the total weight of the flour represents 100%, and all other ingredients are compared by weight to that total and expressed as a percentage. Using baker’s math and the baker’s percentage is helpful when it comes to scaling a recipe up or down—increasing or decreasing its size—and communicating with other baker’s about the qualities of your bread.
Once you become familiar with baker’s math, you will also be able to create and tailor your own recipes easily.
Coming soon to Bread & Basil: A full article on Baker’s Math and the Baker’s Percentage
Banneton or Proofing Basket

Shaped dough is often placed into a vessel known as a proofing basket or banneton, which is a container made of a light, breathable material that allows airflow through its sides. By letting the dough rest in this basket, it maintains a round or oblong shape while it continues to rise, and it develops a thin skin by having a bit of moisture wicked away during the final proof. The dough gets turned out of the banneton just before being scored and getting baked—you don’t bake the bread inside this basket.
Bannetons often come with a fabric liner; I use the liner when I’m working with particularly wet dough, or when I don’t want the lines of the banneton imprinted on the surface of my bread (such as in the case of an intricately scored loaf).
If you don’t own or want to buy bannetons, I have found that using a colander or salad spinner basket lined with a clean, cut piece of t-shirt or a lint free tea towel secured with a rubber band works perfectly well. Those types of vessels allow for good airflow, and a t-shirt dusted with flour should not stick to the surface. It is important to always remember to dust your banneton or make-shift basket with flour because if your loaf sticks to the basket, it will lose shape and therefore volume during the transfer into the oven. White rice flour is the preference of many bakers, including myself, as it doesn’t brown during the long bake at high heat and provides nice contrast for scoring patterns.
Bench Scraper
A bench scraper is a thin, flat tool used for dividing and manipulating dough, as well as cleaning your work surface. Bench scrapers can be made of plastic or metal. I tend to reach for my metal bench scraper more often, because I prefer the firmer feel of the stainless steel to the more flexible plastic. It is handy to have one of each, though!
Bulk Fermentation
Baker’s call the first rise of a dough the bulk fermentation. After all the ingredients get mixed together—and after the autolyse if there is one—the dough is allowed to rise for a period of time so that the wild yeast in the starter can begin to produce gas by eating the starches in the raw flour. This gas is what increases the volume of the dough. Many recipes also include instructions on how to fold your dough during bulk fermentation to help develop dough strength.
A recipe will usually give both a time and visual cue for the length of bulk fermentation, such as, “about 5 hours, or until the dough looks voluminous and has just about doubled in size.” A clear-sided container is useful here so that you can measure the progress of the dough in both volume and in how well the air pockets are distributed from top to bottom.
The length of this process is dictated by three main factors:
The amount of starter in your recipe: the higher the amount of starter, the faster bulk fermentation goes.
The temperature you’re fermenting at: warmer room temperature, around 75°F, will cause dough to rise more quickly than cooler room temperatures, like 68°F. Using a proofing drawer will speed things up, too.
The type(s) of flour being used. Whole grain flours and freshly milled flours will ferment more quickly than white flours.
At the end of bulk fermentation, the dough should be light, aerated throughout, and contain visible bubbles on the surface as well as within the dough. It will no longer be as sticky, and should be relatively easy to handle compared to when you first mixed the ingredients.
For a detailed visual and descriptive guide, check out the Dough Development section of my Beginner’s Sourdough Guide.
Cooling
Cooling a loaf of sourdough bread is just as important to the process as every other step. As the starches heat up in the oven, they absorb a lot of water. If you cut the loaf before properly cooling it—no longer warm to the touch at all—the starches don’t have the opportunity to fully gelatinize, and steam will escape from the loaf instead of fully settling inside the bread, which leads to a poor texture. Loaves that are cut too soon will be gummy, wet, and leave sticky residue on your bread knife. They will also stale faster because the moisture has not reabsorbed into the crumb correctly.
I know it’s so hard to resist tearing into a hot loaf, but you will undo all the good work you did throughout the baking process if you cut it too soon. Wait until the loaf is completely cool, and you will be rewarded in texture, taste, and longevity.
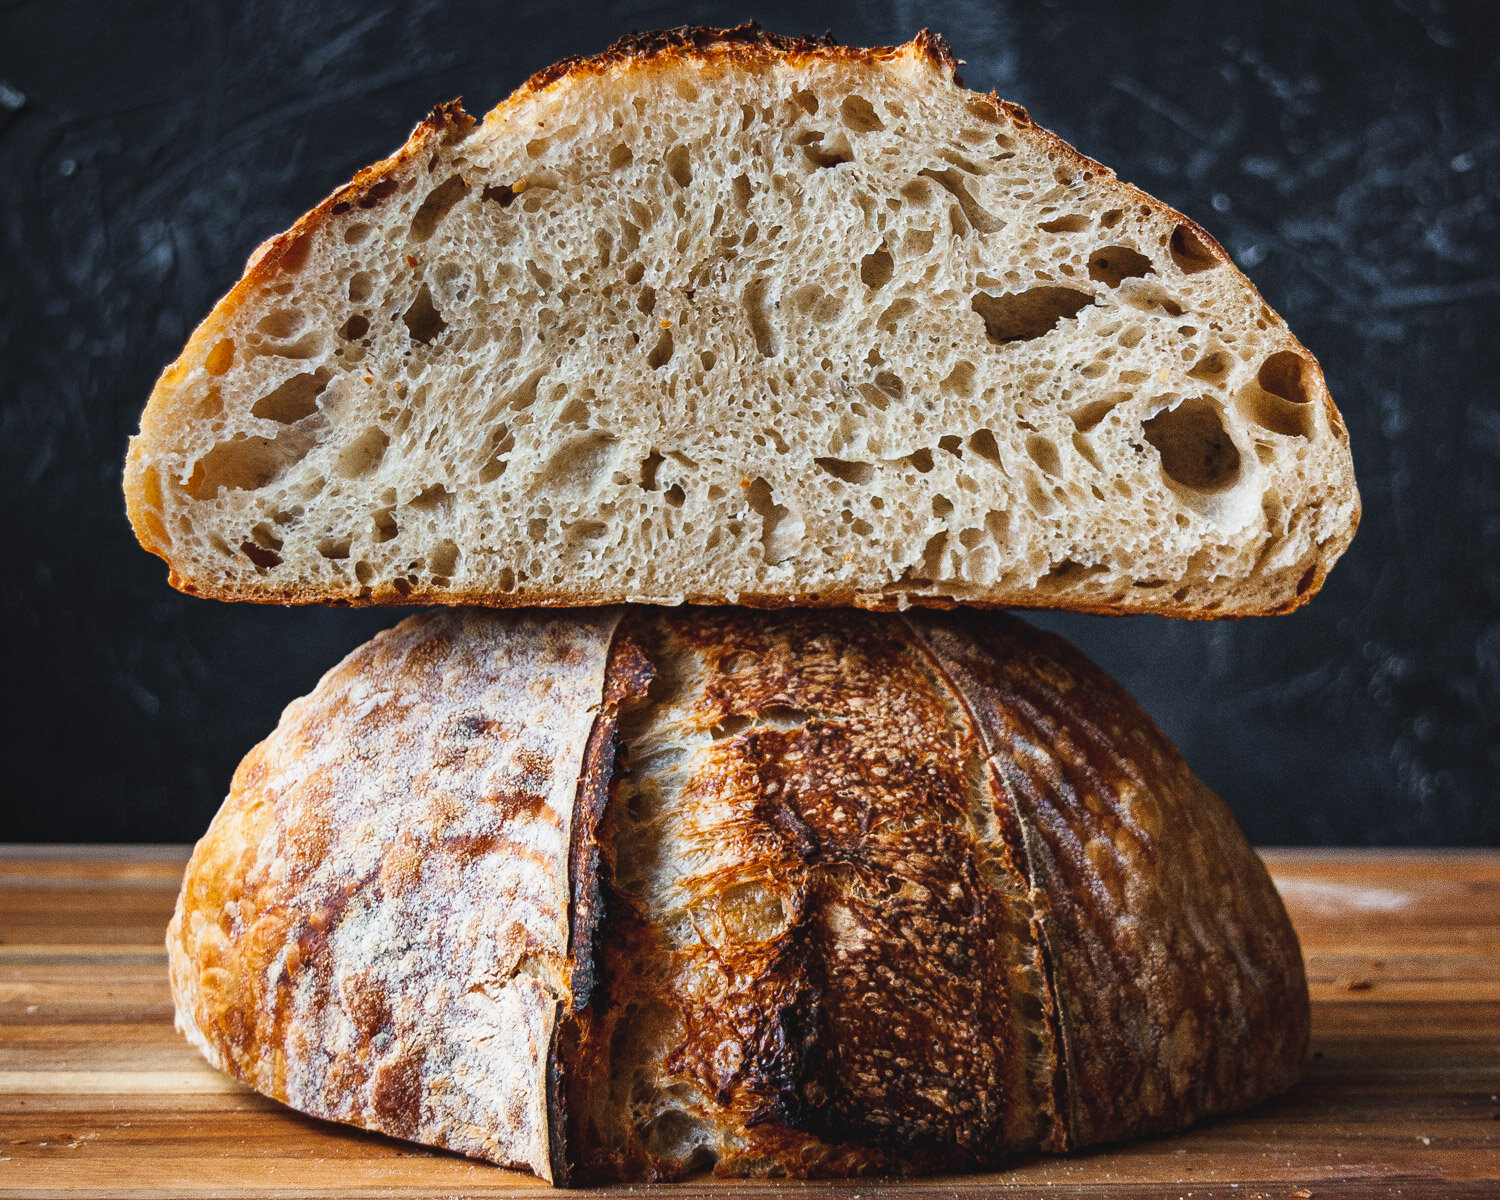
Crumb

The crumb is the interior of the loaf. An open crumb refers to a loaf with large, well-distributed pockets of air, where as “closed texture” refers to a crumb with smaller holes. The crumb is one of the most useful diagnostic tools in figuring out where a loaf of bread may have gone right or wrong. It’s important to know that an open crumb is not necessarily a better crumb. There are all types of correct crumb structures that provide different textural experiences for the eater, so don’t get too hung up on replicating the big, puffy loaves you may frequently see.
Bread made with higher proportions of whole wheat will generally have a denser crumb, while white flours tend to produce an airier crumb.
Hydration also affects the crumb. Many times a higher hydration dough will produce a more open crumb, while a lower hydration results in a more closed crumb. However, 70% hydration for a flour such as rye or einkorn is not going to produce the same crumb structure as 70% hydration for white flour, as whole grains tend to absorb a lot more water than white flour, so this is just a general guideline.
Crumb will also be affected by the mixing technique and whether gluten development was sufficient or not, whether bulk fermentation was long enough or too long, and how a loaf is proofed.
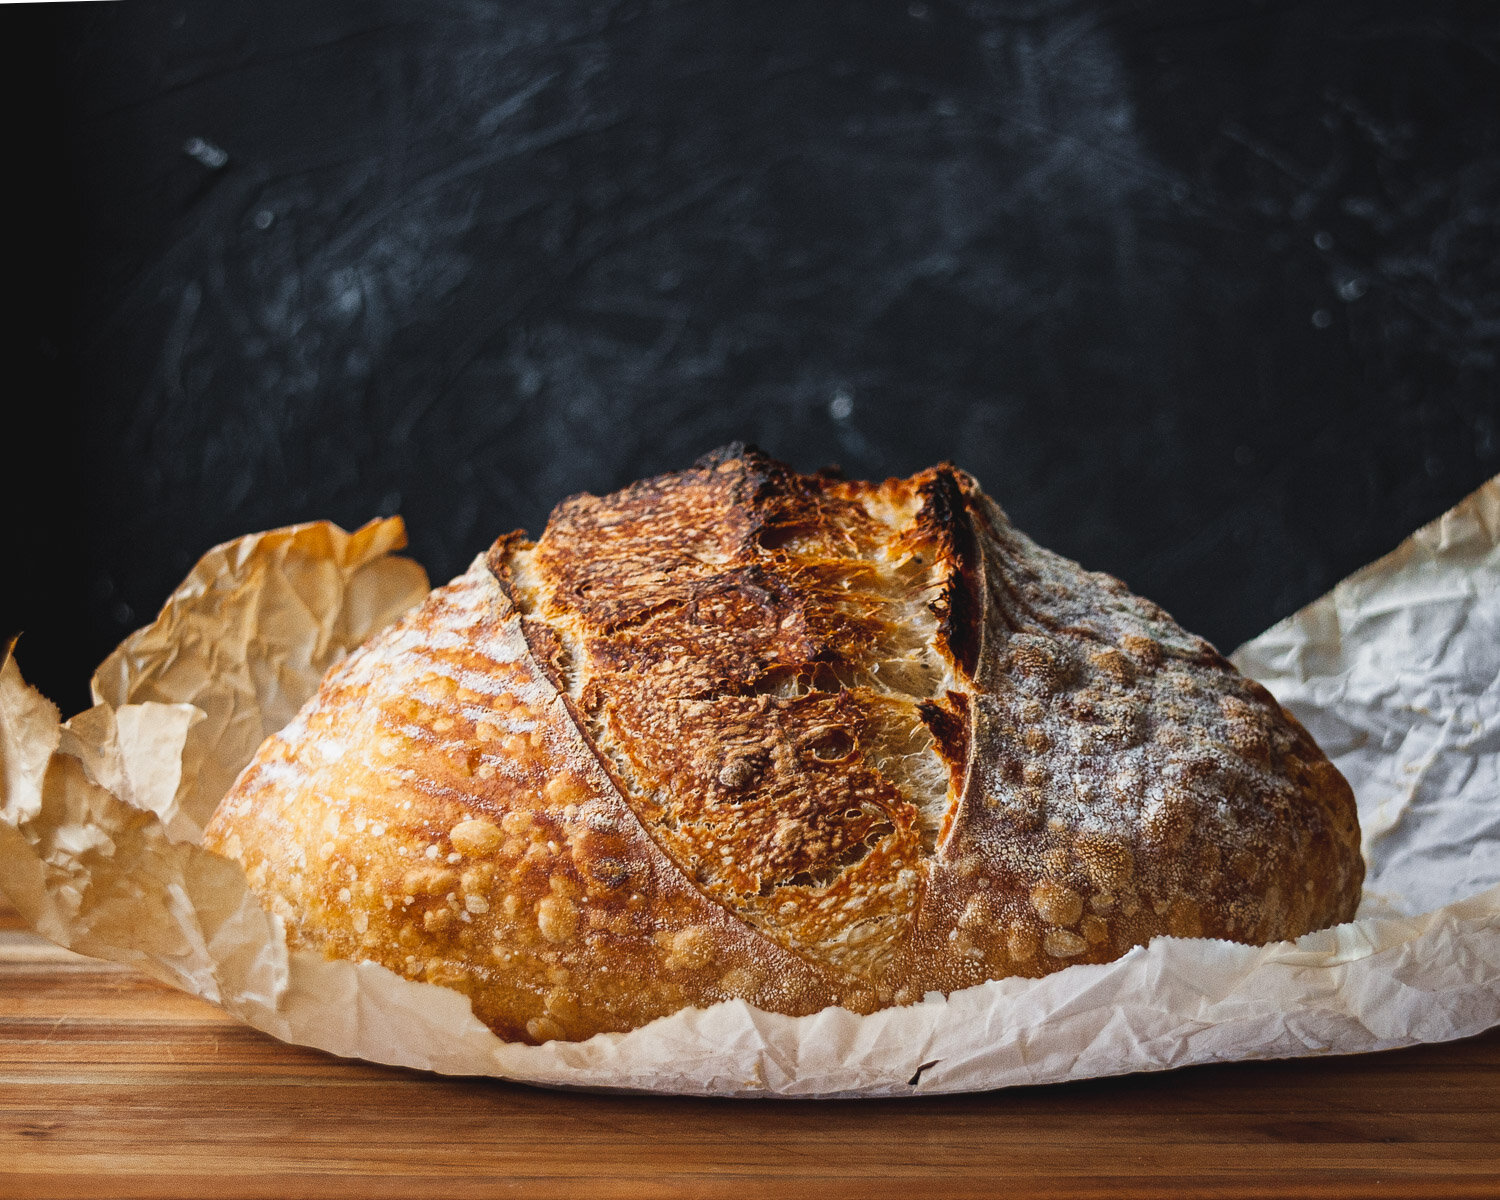
Crust
The crust refers to the exterior of the loaf. Crust color and texture are dictated by a loaf’s ingredients, how well it was fermented, and the baking time, temperature, and technique. Baking with steam helps develop that signature thin, crackly crust.
An “ear” or flap of dough that raises away from the rest of the loaf where scored (seen on the loaf pictured above) is coveted by many bakers, as it’s a sign of great oven spring, well controlled scoring, and good fermentation.
Blisters on your crust are a sign of a well-fermented dough and good surface tension created during shaping.
If the crust on the bottom of your loaf is getting too dark, try placing a baking tray on the bottom rack of your oven (underneath your dutch oven, or stone, or primary baking tray) to act as a shield to the crust.
Dough Formula
A dough formula is a list of all ingredients needed to make a loaf of bread that can be quantified by weight, by baker’s percentage, or both. Simply put, this is the “Ingredients” section of the recipe.
Dough Whisk
A dough whisk, also known as a Danish dough whisk, is a long-handled mixing tool with a specially-shaped coil of sturdy metal on the end. This looped tool helps to combine the ingredients in a dough, cutting through the flour and incorporating it well without the dough sticking to the mixing tool. It’s not a must-have; wet hands or a spatula work well, too. It does, however, get the job done well, and with less clean up than the other tools mentioned.
Final Proof
The final proof occurs after the bread has been shaped and placed in its basket to rise a second time. Ideally, you end the final proof right before the wild yeast in your dough are finished eating up the starches, but before they become full and start to die off. This allows for the maximum amount of oven spring. This step can be challenging to gauge, but I’ve included tips below in order to know when your bread is ready to score bake.
Many bakers, including myself, choose to do the final proof in the refrigerator. By chilling the dough as it does its final rise, you are able to slow down the fermentation long enough to develop more complex flavors in the bread. You can also more easily avoid over-proofing, or when your dough has sat in the basket too long and the yeast begin to die off. Over-proofed loaves lose their structure and don’t rise tall in the oven.
Under-proofing, on the other hand, is when you do not allow the dough to rise enough before placing it in the oven. Both over-proofed and under-proofed doughs will have subpar crumb structure, in different ways:
Overproofed: flat, dense loaf, lost all air, spreads out while baking and difficult to score
Underproofed: has big, irregular holes, large holes at top of loaf and closed texture on bottom, sides of the loaf pull up slightly (the bottom is not flat, but a bit curved), good oven spring but has large tunnels or caverns in the crumb, crust bursts and splits beyond where it was scored
Recipes that utilize a cold final proof will often give a window of time such as 12-14 hours, but depending on the recipe you may be able to push it as long as 18 hours without compromising the texture of the final loaf—just put the loaf in the back of your refrigerator to keep it extra cold. I’ve done this when I need to buy some time in the process to fit my schedule.
If you pull a loaf out of the refrigerator and it still has a very rounded top and hasn’t filled out in the basket yet, allow it to warm up at room temperature as your oven preheats, and let it proof further until it passes the poke test.
There are a couple occasions where I would not use a cold final proof, such as if I wanted to mix and bake a loaf in one day. If you are doing the final proof at room temperature, I recommend doing the poke test every 20 minutes to monitor your dough’s progress, as it’s much easier to overproof warmer dough.
Both over and under proofed loaves do not have the “correct” crumb structure, but don’t fret; they’re often salvageable by turning them into something like breadcrumbs or croutons.
Folding (types of folds and gluten development)
Dough is folded during the beginning stages of bulk fermentation in order to develop gluten within the dough. Developing gluten allows the dough to build strength, becoming more elastic and strong enough to hold tension for shaping while also holding onto the gas pockets created during fermentation.

The term stretch and fold is the name of a mixing technique preferred by many bakers for its ease. Instead of vigorously kneading the dough all at once, I like to incorporate about 3 minutes of stretching and folding once the salt is added to a dough. Then, you can return to the dough every so often, such as every 30 minutes, and do an additional set of stretch and folds. One set is considered folding each side, north, south, east, and west, up and over, as show in the video. Each set develops the gluten further, allowing the dough to become strong enough to hold its shape and produce a nice crumb.
Another method you might read about is the coil fold. This involves picking up the entire bulk of the dough so that it drapes out of your hands on either side, allowing gravity to stretch the dough, then replacing it back in the container with the hanging sides folded underneath. This method is great for incorporating air, but typically only works for very high hydration doughs, which can be tricky to handle for a beginner.
There are other mixing techniques available to the home baker as well. The slap and fold technique involves removing the dough from its container, slapping it against a work surface, and then folding it onto itself. This is fun, but a bit messy, tiring, and frankly noisy, so it’s not my preferred method. But if you need to get some aggression out, slap and fold away!
Lamination is also a type of dough manipulation. This involves stretching the dough onto a surface into a rectangular shape, then folding the dough back up like a letter until it forms a ball again. Lamination develops a lot of strength in a dough and can also be used to incorporate filling such as nuts, seeds, or fruits. It can be tricky to perform for people new to handling dough, so begin with stretching and folding to get used to the manipulation process before trying this.
No matter the folding method, you can expect to do anywhere between 2-5 sets of folds during the beginning of bulk fermentation, so it’s best to stick around while your dough rises, at least for the beginning.
In some cases, a recipe will tell you to use a mixer. I usually prefer to develop doughs by hand, but will specify mixer directions if I find them useful in a particular bake.
Hydration
The amount of water in a sourdough formula is referred to as the hydration of the dough. Hydration is calculated by finding the total weight of flour used and then comparing that to the total weight of water used, and expressing this number as a percentage. I have an interactive tutorial on my Instagram titled “Baker’s Math 101” here.
Coming soon to Bread & Basil: A full article on Baker’s Math and the Baker’s Percentage
Doughs that are higher in hydration will generally be more slack, or loose to handle, and will produce more open crumbs. Doughs that are lower in hydration are easier to handle and shape, and produce a more closed-texture final product.
Whole wheat and freshly milled flours tend to absorb more water than white flours, so you can often raise the hydration of a loaf a bit if choosing to incorporate more whole grain.
Levain
Levain is a batch of starter specifically created to go into the final mix of a bread dough. This is different from the “mother” starter that you reserve a portion of each time, in order to feed and continue growing for the next bake.
Levain is a type of pre-ferment, meaning a mixture of ingredients that gets left to rest before being incorporated into the final dough. Biga and poolish are also words used to describe pre-ferments, though they often contain yeast.
Any recipe on my site will specify if you need to build a specific levain, or if you can bake directly from a portion of your starter.
Oven Spring
The term oven spring refers to the amount of volume a loaf of bread gains once you put it in the oven to bake. Oven spring occurs in the first 15-20 minutes of baking; after this, the size is set and the loaf will continue to cook inside and gain color on the exterior.
There are multiple factors that influence oven spring, including:
Whether your loaf is properly proofed, under, or over-proofed
The temperature of your oven. Hotter is better, and using a preheated cast iron dutch oven or a baking stone helps to provide a more intense, direct heat. Most bread recipes will suggest you preheat your oven for at least an hour prior to baking, which I also recommend.
The way the bread is scored: the deepest cuts will open up the widest, while smaller, shallower cuts will not open up as dramatically
How much steam you introduce during baking
Professional bread bakers often use steam ovens that inject moisture into the baking chamber during the first few minutes of baking.
My preferred method for making steam at home is in a preheated dutch oven or covered baking vessel. The lid traps the steam escaping from the loaf to collect on top, which drip back down onto the loaf’s crust. This allows the loaf of continue to rise tall without the crust drying out during the first 20 minutes of baking. After 20 minutes, remove the lid to allow the loaf to brown.
If you don’t have a dutch oven, you can create steam in your oven by preheating a rimmed baking tray or cast iron pan in your oven along with your baking stone or baking sheet for the loaf. Before you score the bread, quickly add some ice cubes to the preheated baking tray or pan, which will introduce steam. Then, add the loaf and bake as instructed.

Poke Test
To know when the loaf is properly proofed, I like to perform the poke test during the final proof. To do this, dust a bit of flour right onto the center of the loaf (still in the basket) and poke your finger down 1 inch into the loaf. If it springs back to fully fill the indent, it needs to proof a bit longer. Properly proofed dough will spring back slowly, leaving a small indent where you pressed but filling in most of the way, as show in this video. If there is no spring back and the hole stays sunken, your loaf is overproofed.
Pre-shape
In order to encourage your dough to create a nice round or oblong shape, it’s helpful to coax it into a general shape and allow it to rest on the counter before performing the final shaping. This step is called the pre-shape.
After the dough is finished with bulk fermentation, it’s time to dump it onto a lightly floured work surface. First, divide it in to however many loaves you are making. This Beginner’s Sourdough Recipe makes just one loaf, so there’s no need to divide. I often make enough dough for two loaves at a time, but I could choose to make 4 mini loaves as well. However you choose to divide your dough is your choice, but keep in mind that it’s generally easier to shape something on the smaller side than a huge mass of dough.

To preshape the dough, you take a section of divided dough (or all the dough if making just one loaf) and start to give it a shape. There are many ways to do this, but I use lightly wet hands to handle the dough, tucking the north, south, east, and west sides of the divided dough into a ball, then gently flip it so that the seam is down. I allow this loosely shaped ball to rest on the counter for anywhere between 15-30 minutes depending on how tightly I preshaped; tighter preshape means a longer counter rest, looser preshape means a shorter counter rest.
By allowing the dough to rest on the counter after preshaping, we are allowing the gluten proteins to organize and relax a bit before we manipulate the dough into its final shape.
Scoring

Scoring, or making a cut or slash in the surface of a ball of dough, allows steam within the loaf to escape through a controlled exit point, helping your bread grow taller in the oven. Scoring should be primarily functional, but can absolutely be decorative as well.
The preferred tool used by professional bakers and home bakers alike is called a lame. It is a thin double-edged razor blade either attached to a short or long handle. You can also use a brand new single edged razor blade held carefully, or if need be, the sharpest knife in your kitchen.
Dough that has proofed in the refrigerator and is cold will be easier to score than room temperature dough. Dusting flour on the top of the loaf helps prevent the blade from dragging through the dough as you cut.
Scoring should be swift, and you should get the loaf into the oven right after scoring to prevent it from spreading too much.
This video demonstrates a simple scoring technique, where I hold the blade at a 45° angle to the surface of the dough and slash directly from top to bottom. The loaf will puff up at this scoring point, creating a big “belly” between the hard, crusty edges.
The lame you see me use in the video is a Wire Monkey Shop UFO lame. If you purchase this lame through this link—and I highly recommend you do, it’s my favorite for its ease of handling, small size, and beautiful design—I will receive a few dollars that help me run the blog.
Shaping
Once your dough has been pre-shaped, it is time for shaping. To do so, we take the already-round ball of dough (from pre-shaping) and use our hands or a bench scraper to drag the ball of dough along the surface of the counter until it has formed a tight skin. This is perhaps the most tricky part for a beginning baker, and practice is really the key to good shaping.
The most common shapes for sourdough are a boule, or round loaf, and bâtard, or oblong loaf. There are other shapes you can form, but I find the easiest to get started with is the classic boule. Watch the video below to see how I use my bench scraper to form surface tension across the dough ball to create a taught, bouncy boule. The dough may look sticky, but pay attention to how little actually sticks to my fingers, and how it doesn’t smear all over the counter. It’s well-hydrated and aerated, and enough gluten has developed for me to be able to handle it without bits of dough sticking everywhere. Using a light touch and wet hands helps when handling dough during the shaping stage.
At the end when I flip the dough seam-side up into the basket, I noticed the bottom seam wasn’t quite sealed, so I gently stretched and “stitched” together the bottom to form a tighter ball. This stitching action can also be done if you weren’t able to achieve a very tight ball in the first place. Just allow the bread to rest, seam-side up in the basket, for about 10-15 minutes. Then work around the loaf, gently pulling up and over to the other side all the way around the ball until you’ve tightened the surface.

My favorite surface for shaping dough is a wooden counter or board, but you can use any surface so long as there is some friction. Adding too much dusting flour will prevent your dough from being able to drag across the surface, and will actually make shaping harder. Notice how little I use in the video. Embrace a little bit of sticking; if your dough went through bulk fermentation properly, it shouldn’t be too hard to handle. Keep in mind, wetter doughs with higher hydration will always be harder to shape.
Sourdough Starter
A sourdough starter is a mixture of flour and water that is allowed to ferment over time, creating a natural community of wild yeast and bacterial which can successfully leaven, or raise, a loaf of bread.
Breads made with sourdough starter are referred to as naturally leavened, meaning they contain no commercial (instant, active dry, or cake) yeast.
Cultivating a starter is the first step to creating your own sourdough bread. Learn how to make one and care for it with my all-in-one recipe and guide, Everything You Need to Know about Sourdough Starter.
Windowpane Test

The term windowpane test is used to describe the state of the dough when it has been kneaded/folded enough and has a strong gluten network. To see if a dough passes the windowpane test, gently lift up a piece from the surface and stretch it between two fingers. If you can stretch it thin enough to be almost translucent without it ripping, the dough has developed enough gluten and you can stop folding for the remainder of bulk fermentation.
Ready to bake?
Get started with my Beginner’s Sourdough Bread recipe.
Did you find this guide helpful? Leave a comment below!
Have a question I didn’t answer? Leave a comment, or send me a message on Instagram.